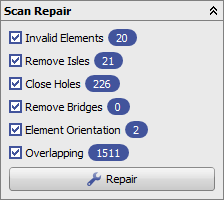
Repair functions in the 3D image adjust module
Automated repair
The automated repair is essential for models since it ensures data quality requirements for a faster and more robust processing in all following steps of the program.
All options which are checked are applies to all selected items of the object list (and to all if none is selected). Which steps are necessary depends on the image source and the modules in which the data set should be used. Typically all options should be used.
In detail:
- Invalid Elements: Removes faulty triangles and other invalid mesh elements
- Remove Isles: Removes all components (i.e. separate surfaces in a single object) except the largest. Disable this for objects splitted intentionally
- Close holes: Closes small holes in the topology of the dataset, use manual scan repair for larger holes
- Remove Bridges: Cuts invalid connections between object parts (such as between two teeth). Disable this for objects with valid handles or tunnels.
- Element Orientation: Corrects flipped triangles (i.e. triangles oriented inside out)
- Overlapping: Removes self-intersections to prevent invalid object volumes (important e.g. for 3D printing)
Displayed behind each option is the number of faults corrected in the previous repair step. This count should be single-digit and the number of repair steps needed to achieve this depends on the quality of the scan (software). If an image source constantly delivers meshes with very few errors, the repair can be skipped (althrough at least one repair pass is recommended).
Manual Scan Repair
The panel Manual Scan Repair can be used to cut, optimize or segment any 3D object. Each function can be switched on or off by clicking the respective icon.
- Smooth Region: Remove small artifacts, such as blisters from the impression. Right click the surface to initialize the selection, adjust the selection size and drag it around for marking relevant object parts. Unselect by holding the Ctrl-Key while dragging.
- Add Bridges: Right click two border points on an object to connect the two borders. If the suggested bridge is not good, discard it by switching the function off and on again. Use this in combination with hole patching for larger gaps.
- Eraser: Initialize the selection by right click and drag the sphere for selection (holding the Ctrl-Key unselects).
- Close holes: Iterate through the model holes (from smallest to largest) and compute first the preview of the closing surface, then accept the result. Computational time increases from small holes (color-coded in green) to complex (yellow) to too complex (red, force close by holding Ctrl)
- Surface cutting: Right-click a cutting line to separate the mesh in two parts, from which one is deleted when the line is closed. Drag and drop the points for correcting the line.
- Polygonal punching: Right click a polygon in the view plane and mark all triangles inside (also behind the forground surface!). Add or remove (holding Ctrl) part of the selection before splitting or removing parts.
Hints for textured objects
If the object texture is stitched from different parts (as common which some face scanners), these parts must be combined to one before proceesing with automated or manual repair.
The images saved from a face scanner are often stored in separate images (such as frontal and sides) and mapped onto different parts of the surface. Inspect the current texture using the dialog "Edit Texture" in the panel "Object modifications".
For an automated correction of the texture, the model should be cut before to remove invalid an irrelevant parts. You must use the scissor in the upper left corner of any 3D view, not the manual scan repair. After this, align the object as intended (forward facing for a facescan) and select "Merge Textures" in "Object modifications".
Model scans with textures should be converted to per-point colors, which is also available from the panel "Object modifications".

